
Studio Projects may contain any type of file, not just PDFs. PDF files will open in Revu while other file types will open in the default program associated with it on your device.
Only Hosts and those with appropriate permissions can upload documents to a Project.
Note: In order to upload or download a file in Studio, the system clock of the local machine must be set up correctly so that it is in sync (within 15 minutes) with UTC, otherwise any attempt to upload or download a file in Studio will result in an error. Update the system clock of the local machine so that it is correct for the time zone specified in its Date and Time settings and try the upload or download again.
Users can create new folders in the Project, select individual files to upload, or upload an entire folder and its contents.
Users can only add files to a Project that they have started or for which have been granted the appropriate permissions.
To add files to a Project, CTRL-click the Project name or a folder within the Project and select the desired option:
PDF files in a Project can be added to a Studio Session. This makes it possible to work on Project files using the real time collaboration advantages of a Session. An icon will appear next to the name of any Project file that has been added to a Session.
Only Sessions that are created using this feature can have Project files added to them. Therefore, unless you are adding more PDFs to a Session that has already been created for this purpose, the first step is to add a file to a new Session, as described below. Once the Session has been created, additional Project files can be added.
Users must have the Send PDFs to Sessions permission to use this feature. The user who sends the first Project file to the Session is automatically the Session Host and can send additional Project files to the Session as desired; any other user in the Project who wishes to send additional Project files to the Session not only needs to have the Send PDFs to Sessions permission in the Project, but also must be added to the Session and have the Add Documents permission in it.
To add files to a new Session:
To add files to an existing Session:
The icon appears next to the file name in the Studio tab to show that this file is also in a Session.
You can download any or all Project files to a local or network drive.
It is sometimes necessary to replace Project files with updated copies from a local or network drive. To do so:
Users can share Project files with people outside the Project, providing them a link through which they can download a local copy of the file. The recipient will not have access to other Project files or features, but they will be able to use the same link to download updated versions of the file for as long as the link is active.
To share a link to a Project file:
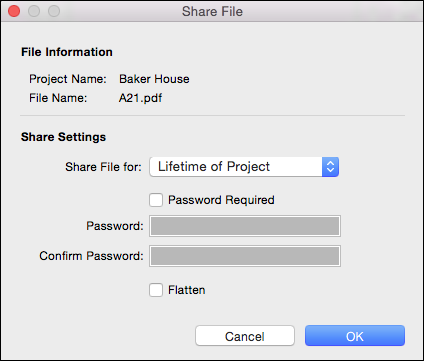
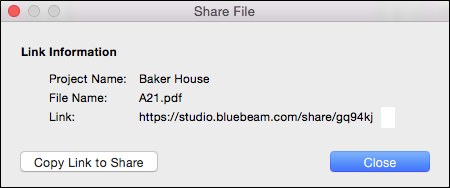
When your recipient receives the link, they will need to open it in the browser of their choice, which will provide them with a download button that they can use to retrieve the file. If a password is required, they will be prompted for it first.
You can force external links to Project Files to expire ahead of their scheduled expiration, if desired. Users with sufficient permissions (Project owners or users with Full Control) can force the expiration of any link in the Project; all others can only force the expiration of links they generated.
To force a Project link to expire:
Project owners who want to see what Project files have been shared with people outside the Project can view all links, both Active and Expired, on the Manage Shared Links page.
To audit shared links:
There are a few icons that can appear next to Studio files to show the status of the file. These icons can appear on the document tab or in the Project file list.
![]()
Indicates that the PDF is a Project file that you have checked out.
Indicates that the PDF is a Project file that you have opened, but not checked out. This file is read-only. To check out the file so you can edit it, CTRL-click and select Check Out.
Indicates that the PDF is a Session file.
Since Session documents are not checked in and out they do not have different statuses like Project files, so the only place you will see status icons in a file list is inside a Project.
![]()
Indicates that the PDF is a Project file that you have checked out.
Indicates that the PDF is a Project file checked out to another user. CTRL-click on the file and select Properties to find who has the file checked out.
Indicates that the PDF is a Project file that you have opened, but not checked out. This file is read-only. To check out the file so you can edit it, CTRL-click and select Check Out.
Indicates that the PDF is a Project file that has been added to a Session.
Files not checked out by you
CTRL-click on a file in the Project file list and you have the following options depending on the file type, the current status of the file, and your permissions:
Open: Opens the file for viewing. Files that are only opened (but not checked out) cannot be edited.
Check Out: Opens the file (if it is not already) and checks it out to you. Only files that have been checked out can be edited and only one user can check out a file at a time.
Download Copy: Downloads a copy of the document to a local or network drive.
Rename: Changes the name of the file.
Cut: Cuts the file from its current location so you can move it to another folder in the Project.
Copy: Copies the file so you can paste another copy into another folder in the Project.
Paste: Pastes a cut or copied file into the selected folder.
Delete: Removes the file from the project.
Add to New Session: An the PDF file to a new Studio Session. Only valid for PDF files.
Add to session name: Add the PDF file to this existing Studio Session. Only valid for PDF files.
Share Link: Allows you to provide a link to the Project file that can be used by somebody outside the Project to open and view the file.
Revision History: Shows the revision history of the file and allows you to open a previous version of the file.
Properties: Shows the properties of the file, including its name, project path, status, creation date, and size.
Files checked out by you
CTRL-click on a file in the Project file list and you have the following options depending on the file type, the current status of the file, and your permissions:
Open: Opens the file for viewing and/or editing.
Open Project Copy: Opens the server copy of the Project file in a new tab.
Download Copy: Downloads a copy of the document to a local or network drive.
Check In: Saves the file to the Project and makes it available for another user to check out.
Update Server Copy: Updates the Project file with changes you have made but does not check it in.
Undo Check Out: Releases your Check Out (making it available for another user to check out) and discards any changes you made to the file.
Replace File: Allows you to replace the server copy of a Project file with one from a local or network drive.
Revert Changes: Reverses any changes you have made to the Project file that you have not checked in, essentially opening the server copy again.
Copy: Copies the file so you can paste another copy into another folder in the Project
Share Link: Allows you to provide a link to the Project file that can be used by somebody outside the Project to open and view the file.
Revision History: Shows the revision history of the file and allows you to open a previous version of the file.
Properties: Shows the properties of the file, including its name, project path, status, creation date, and size.